通知
简介
除了支持发送电子邮件之外,Laravel 还支持通过各种传递渠道发送通知,包括电子邮件、短信(通过 Vonage,以前称为 Nexmo)和 Slack。此外,还创建了各种社区内置的通知渠道,可以通过数十个不同的渠道发送通知!通知也可能存储在数据库中,以便它们可以显示在你的 Web 界面中。
通常,通知应该是简短的信息性消息,通知用户应用程序中发生的事情。例如,如果你正在编写计费应用程序,你可以通过电子邮件和 SMS 渠道向用户发送「发票已付」通知。
生成通知
在 Laravel 中,每个通知都由一个类表示,该类通常存储在 app/Notifications 目录中。如果你在应用程序中没有看到此目录,请不要担心 - 当你运行 make:notification Artisan 命令时,它将为你创建:
php artisan make:notification InvoicePaid此命令将在你的 app/Notifications 目录中放置一个新的通知类。每个通知类都包含一个 via 方法和数量可变的消息构建方法,例如 toMail 或 toDatabase,这些方法将通知转换为为该特定通道定制的消息。
发送通知
使用 Notifiable Trait
通知可以通过两种方式发送:使用 Notifiable 特征的 notify 方法或使用 Notification facade。默认情况下,Notifiable 特征包含在应用程序的 App\Models\User 模型中:
<?php

namespace App\Models;

use Illuminate\Foundation\Auth\User as Authenticatable;
use Illuminate\Notifications\Notifiable;

class User extends Authenticatable
{
    use Notifiable;
}
此特征提供的 notify 方法期望接收通知实例:
use App\Notifications\InvoicePaid;

$user->notify(new InvoicePaid($invoice));
INFO
请记住,你可以在任何模型上使用 Notifiable 特征。你不仅限于将其包含在你的 User 模型中。
使用 Notification Facade
或者,你可以通过 Notification facade 发送通知。当你需要向多个可通知实体(例如用户集合)发送通知时,此方法非常有用。要使用外观发送通知,请将所有可通知实体和通知实例传递给 send 方法:
use Illuminate\Support\Facades\Notification;

Notification::send($users, new InvoicePaid($invoice));你还可以使用sendNow方法立即发送通知。即使通知实现了ShouldQueue接口,此方法也会立即发送通知:
Notification::sendNow($developers, new DeploymentCompleted($deployment));指定投递渠道
每个通知类都有一个 via 方法,用于确定通知将在哪些渠道上传递。通知可以在 mail、database、broadcast、vonage 和 slack 通道上发送。
INFO
如果你想使用其他传递渠道,例如 Telegram 或 Pusher,请查看社区驱动的 Laravel 通知渠道网站。
via 方法接收一个 $notifiable 实例,该实例将是通知发送到的类的实例。你可以使用$notifiable来确定通知应该通过哪些渠道传递:
/**
 * Get the notification's delivery channels.
 *
 * @return array<int, string>
 */
public function via(object $notifiable): array
{
    return $notifiable->prefers_sms ? ['vonage'] : ['mail', 'database'];
}
队列化通知
WARNING
在对通知进行排队之前,你应该配置队列并启动工作人员。
发送通知可能需要一些时间,特别是当通道需要进行外部 API 调用来传递通知时。为了加快应用程序的响应时间,请通过将 ShouldQueue 接口和 Queueable 特征添加到你的类中来让你的通知排队。已经为使用 make:notification 命令生成的所有通知导入了接口和特征,因此你可以立即将它们添加到通知类中:
<?php

namespace App\Notifications;

use Illuminate\Bus\Queueable;
use Illuminate\Contracts\Queue\ShouldQueue;
use Illuminate\Notifications\Notification;

class InvoicePaid extends Notification implements ShouldQueue
{
    use Queueable;

    // ...
}一旦ShouldQueue接口被添加到你的通知中,你就可以像平常一样发送通知了。 Laravel 将检测类上的 ShouldQueue 接口并自动对通知的传递进行排队:
$user->notify(new InvoicePaid($invoice));对通知进行排队时,将为每个收件人和渠道组合创建一个排队作业。例如,如果你的通知有三个收件人和两个通道,则六个作业将被分派到队列中。
延迟通知
如果你想延迟通知的发送,你可以将 delay 方法链接到通知实例化上:
$delay = now()->plus(minutes: 10);

$user->notify((new InvoicePaid($invoice))->delay($delay));你可以将数组传递给delay方法来指定特定通道的延迟量:
$user->notify((new InvoicePaid($invoice))->delay([
    'mail' => now()->plus(minutes: 5),
    'sms' => now()->plus(minutes: 10),
]));
或者,你可以在通知类本身上定义一个 withDelay 方法。 withDelay 方法应返回通道名称和延迟值的数组:
/**
 * Determine the notification's delivery delay.
 *
 * @return array<string, \Illuminate\Support\Carbon>
 */
public function withDelay(object $notifiable): array
{
    return [
        'mail' => now()->plus(minutes: 5),
        'sms' => now()->plus(minutes: 10),
    ];
}
自定义通知队列连接
默认情况下,排队通知将使用应用程序的默认队列连接进行排队。如果你想指定用于特定通知的不同连接,你可以从通知的构造函数中调用 onConnection 方法:
<?php

namespace App\Notifications;

use Illuminate\Bus\Queueable;
use Illuminate\Contracts\Queue\ShouldQueue;
use Illuminate\Notifications\Notification;

class InvoicePaid extends Notification implements ShouldQueue
{
    use Queueable;

    /**
     * Create a new notification instance.
     */
    public function __construct()
    {
        $this->onConnection('redis');
    }
}
或者,如果你想指定用于通知支持的每个通知通道的特定队列连接,你可以在通知上定义一个 viaConnections 方法。此方法应返回通道名称/队列连接名称对的数组:
/**
 * Determine which connections should be used for each notification channel.
 *
 * @return array<string, string>
 */
public function viaConnections(): array
{
    return [
        'mail' => 'redis',
        'database' => 'sync',
    ];
}
自定义通知渠道队列
如果你想指定用于通知支持的每个通知通道的特定队列,你可以在通知上定义一个 viaQueues 方法。此方法应返回通道名称/队列名称对的数组:
/**
 * Determine which queues should be used for each notification channel.
 *
 * @return array<string, string>
 */
public function viaQueues(): array
{
    return [
        'mail' => 'mail-queue',
        'slack' => 'slack-queue',
    ];
}
自定义排队通知任务属性
你可以通过在通知类上定义队列属性来自定义底层排队作业的行为。这些属性将由发送通知的排队作业继承:
<?php

namespace App\Notifications;

use Illuminate\Bus\Queueable;
use Illuminate\Contracts\Queue\ShouldQueue;
use Illuminate\Notifications\Notification;
use Illuminate\Queue\Attributes\FailOnTimeout;
use Illuminate\Queue\Attributes\MaxExceptions;
use Illuminate\Queue\Attributes\Timeout;
use Illuminate\Queue\Attributes\Tries;

#[Tries(5)]
#[Timeout(120)]
#[MaxExceptions(3)]
#[FailOnTimeout]
class InvoicePaid extends Notification implements ShouldQueue
{
    use Queueable;

    // ...
}如果你想通过加密确保排队通知数据的隐私性和完整性,请将ShouldBeEncrypted接口添加到你的通知类中:
<?php

namespace App\Notifications;

use Illuminate\Bus\Queueable;
use Illuminate\Contracts\Queue\ShouldBeEncrypted;
use Illuminate\Contracts\Queue\ShouldQueue;
use Illuminate\Notifications\Notification;

class InvoicePaid extends Notification implements ShouldQueue, ShouldBeEncrypted
{
    use Queueable;

    // ...
}
除了直接在通知类上定义这些属性之外,你还可以定义 backoff 和 retryUntil 方法来指定排队通知作业的退避策略和重试超时:
use DateTime;

/**
 * Calculate the number of seconds to wait before retrying the notification.
 */
public function backoff(): int
{
    return 3;
}

/**
 * Determine the time at which the notification should timeout.
 */
public function retryUntil(): DateTime
{
    return now()->plus(minutes: 5);
}
INFO
有关这些作业属性和方法的更多信息,请查看排队作业的文档。
排队通知中间件
排队通知可以定义中间件,就像排队作业一样。首先,在通知类上定义一个 middleware 方法。 middleware方法将接收$notifiable和$channel变量,这些变量允许你根据通知的目的地自定义返回的中间件:
use Illuminate\Queue\Middleware\RateLimited;

/**
 * Get the middleware the notification job should pass through.
 *
 * @return array<int, object>
 */
public function middleware(object $notifiable, string $channel)
{
    return match ($channel) {
        'mail' => [new RateLimited('postmark')],
        'slack' => [new RateLimited('slack')],
        default => [],
    };
}
排队通知与数据库事务
当在数据库事务内调度排队通知时,它们可能会在数据库事务提交之前由队列处理。发生这种情况时,你在数据库事务期间对模型或数据库记录所做的任何更新可能尚未反映在数据库中。此外,在事务中创建的任何模型或数据库记录可能不存在于数据库中。如果你的通知依赖于这些模型,则在处理发送排队通知的作业时可能会发生意外错误。
如果队列连接的 after_commit 配置选项设置为 false,你仍然可以通过在发送通知时调用 afterCommit 方法来指示在提交所有打开的数据库事务后应调度特定的排队通知:
use App\Notifications\InvoicePaid;

$user->notify((new InvoicePaid($invoice))->afterCommit());
或者,你可以从通知的构造函数中调用 afterCommit 方法:
<?php

namespace App\Notifications;

use Illuminate\Bus\Queueable;
use Illuminate\Contracts\Queue\ShouldQueue;
use Illuminate\Notifications\Notification;

class InvoicePaid extends Notification implements ShouldQueue
{
    use Queueable;

    /**
     * Create a new notification instance.
     */
    public function __construct()
    {
        $this->afterCommit();
    }
}
INFO
要了解有关解决这些问题的更多信息,请查看有关排队作业和数据库事务的文档。
确定是否应发送排队通知
在为队列分派排队通知以进行后台处理后,队列工作人员通常会接受该通知并将其发送给其预期接收者。
但是,如果你想最终确定队列工作程序处理后是否应发送排队通知,你可以在通知类上定义一个 shouldSend 方法。如果此方法返回false,则不会发送通知:
/**
 * Determine if the notification should be sent.
 */
public function shouldSend(object $notifiable, string $channel): bool
{
    return $this->invoice->isPaid();
}
发送通知之后
如果你想在发送通知后执行代码,你可以在通知类上定义一个 afterSending 方法。此方法将接收可通知实体、通道名称以及来自通道的响应:
/**
 * Handle the notification after it has been sent.
 */
public function afterSending(object $notifiable, string $channel, mixed $response): void
{
    // ...
}
按需通知
有时,你可能需要向未存储为应用程序「用户」的人员发送通知。使用Notification门面的route方法,你可以在发送通知之前指定临时通知路由信息:
use Illuminate\Broadcasting\Channel;
use Illuminate\Support\Facades\Notification;

Notification::route('mail', 'taylor@example.com')
    ->route('vonage', '5555555555')
    ->route('slack', '#slack-channel')
    ->route('broadcast', [new Channel('channel-name')])
    ->notify(new InvoicePaid($invoice));
如果你想在向 mail 路由发送按需通知时提供收件人姓名,你可以提供一个数组,其中包含电子邮件地址作为键,名称作为数组中第一个元素的值:
Notification::route('mail', [
    'barrett@example.com' => 'Barrett Blair',
])->notify(new InvoicePaid($invoice));使用routes方法,你可以一次为多个通知通道提供临时路由信息:
Notification::routes([
    'mail' => ['barrett@example.com' => 'Barrett Blair'],
    'vonage' => '5555555555',
])->notify(new InvoicePaid($invoice));
邮件通知
格式化邮件消息
如果通知支持以电子邮件形式发送,则应在通知类上定义 toMail 方法。此方法将接收一个 $notifiable 实体并应返回一个 Illuminate\Notifications\Messages\MailMessage 实例。
MailMessage 类包含一些简单的方法来帮助你构建事务性电子邮件。邮件消息可能包含文本行以及「号召性用语」。让我们看一下 toMail 方法的示例:
/**
 * Get the mail representation of the notification.
 */
public function toMail(object $notifiable): MailMessage
{
    $url = url('/invoice/'.$this->invoice->id);

    return (new MailMessage)
        ->greeting('Hello!')
        ->line('One of your invoices has been paid!')
        ->lineIf($this->amount > 0, "Amount paid: {$this->amount}")
        ->action('View Invoice', $url)
        ->line('Thank you for using our application!');
}
INFO
请注意,我们在 toMail 方法中使用 $this->invoice->id。你可以将通知生成消息所需的任何数据传递到通知的构造函数中。
在此示例中,我们注册一条问候语、一行文本、号召性用语,然后是另一行文本。 MailMessage 对象提供的这些方法使得格式化小型事务性电子邮件变得简单而快速。然后,邮件通道会将消息组件转换为带有纯文本副本的精美、响应式 HTML 电子邮件模板。以下是 mail 通道生成的电子邮件示例:
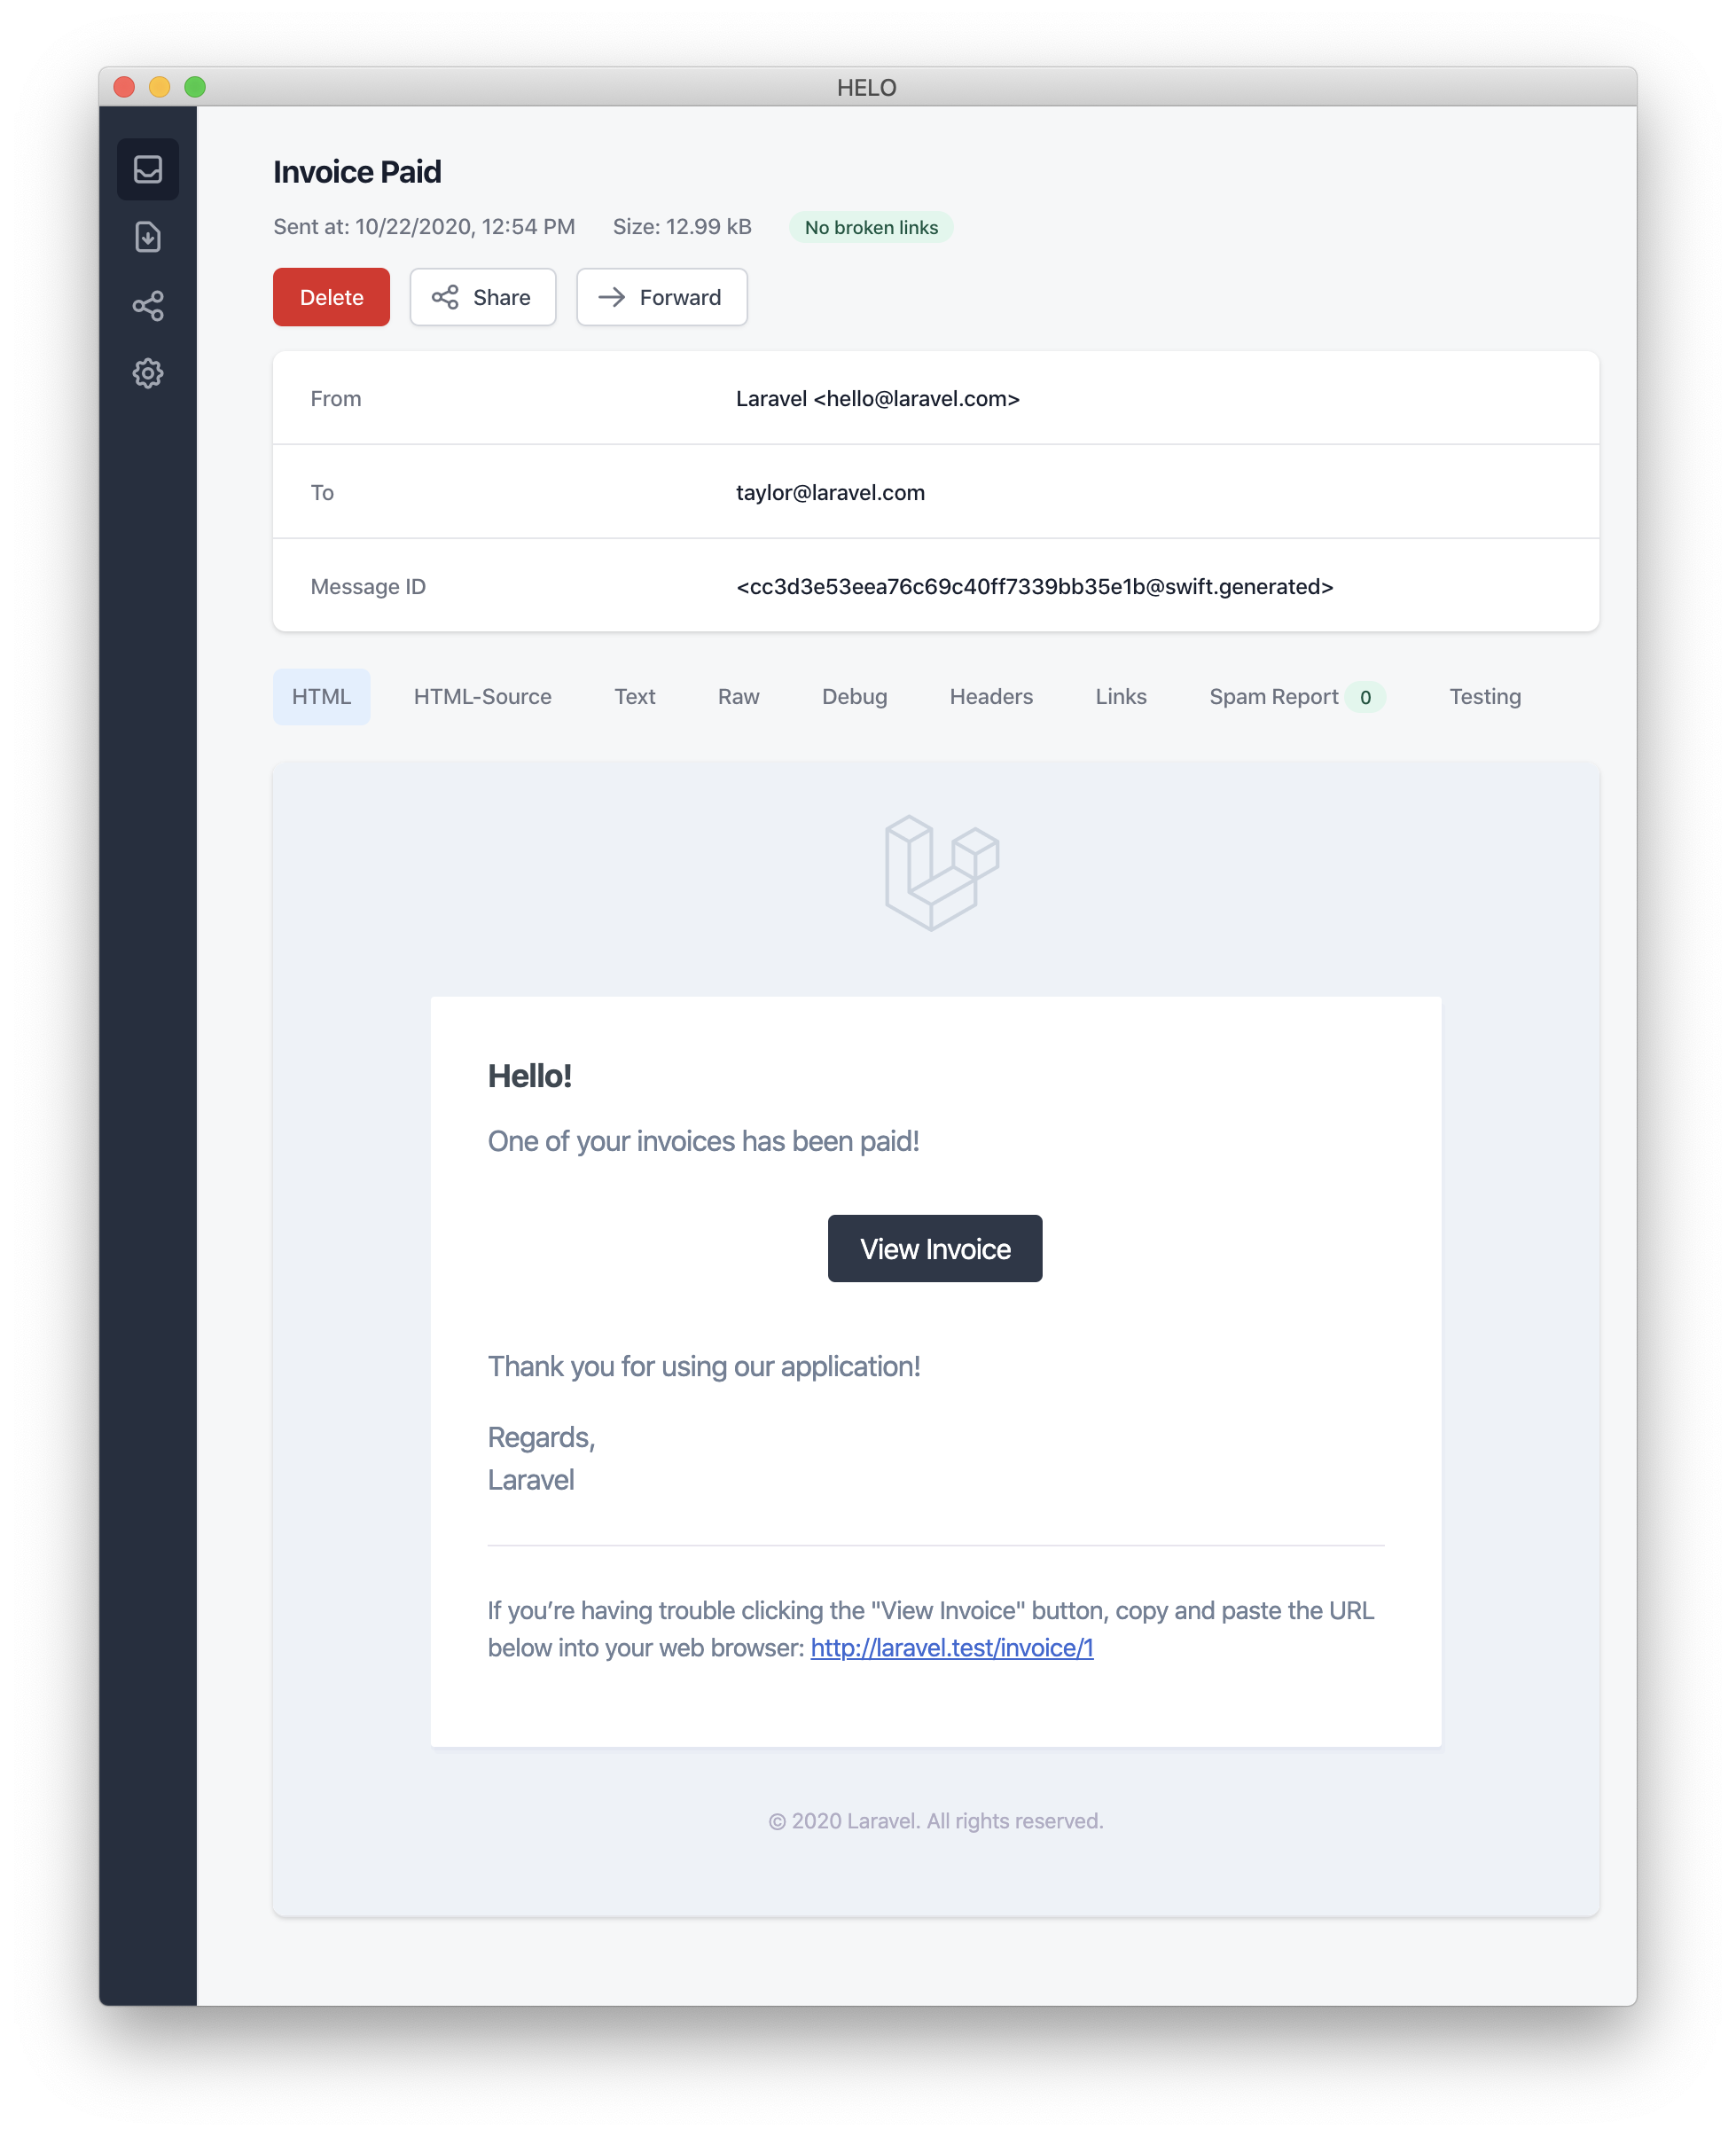
INFO
发送邮件通知时,请务必在config/app.php配置文件中设置name配置选项。该值将用在邮件通知消息的页眉和页脚中。
错误消息
某些通知会通知用户错误,例如发票付款失败。你可以在构建消息时调用 error 方法来指示邮件消息有错误。在邮件消息上使用 error 方法时,号召性用语按钮将变为红色而不是黑色:
/**
 * Get the mail representation of the notification.
 */
public function toMail(object $notifiable): MailMessage
{
    return (new MailMessage)
        ->error()
        ->subject('Invoice Payment Failed')
        ->line('...');
}
其他邮件通知格式化选项
你可以使用 view 方法来指定用于呈现通知电子邮件的自定义模板,而不是在通知类中定义文本「行」:
/**
 * Get the mail representation of the notification.
 */
public function toMail(object $notifiable): MailMessage
{
    return (new MailMessage)->view(
        'mail.invoice.paid', ['invoice' => $this->invoice]
    );
}
你可以通过将视图名称作为数组的第二个元素传递给 view 方法来指定邮件消息的纯文本视图:
/**
 * Get the mail representation of the notification.
 */
public function toMail(object $notifiable): MailMessage
{
    return (new MailMessage)->view(
        ['mail.invoice.paid', 'mail.invoice.paid-text'],
        ['invoice' => $this->invoice]
    );
}
或者,如果你的消息只有纯文本视图,你可以使用 text 方法:
/**
 * Get the mail representation of the notification.
 */
public function toMail(object $notifiable): MailMessage
{
    return (new MailMessage)->text(
        'mail.invoice.paid-text', ['invoice' => $this->invoice]
    );
}
自定义发件人
默认情况下,电子邮件的发件人/发件人地址在 config/mail.php 配置文件中定义。但是,你可以使用 from 方法指定特定通知的发件人地址:
/**
 * Get the mail representation of the notification.
 */
public function toMail(object $notifiable): MailMessage
{
    return (new MailMessage)
        ->from('barrett@example.com', 'Barrett Blair')
        ->line('...');
}
自定义收件人
通过 mail 通道发送通知时,通知系统将自动在你的通知实体上查找 email 属性。你可以通过在通知实体上定义 routeNotificationForMail 方法来自定义用于发送通知的电子邮件地址:
<?php

namespace App\Models;

use Illuminate\Foundation\Auth\User as Authenticatable;
use Illuminate\Notifications\Notifiable;
use Illuminate\Notifications\Notification;

class User extends Authenticatable
{
    use Notifiable;

    /**
     * Route notifications for the mail channel.
     *
     * @return  array<string, string>|string
     */
    public function routeNotificationForMail(Notification $notification): array|string
    {
        // Return email address only...
        return $this->email_address;

        // Return email address and name...
        return [$this->email_address => $this->name];
    }
}
自定义主题
默认情况下,电子邮件的主题是格式为「标题大小写」的通知的类名称。因此,如果你的通知类名为 InvoicePaid,则电子邮件的主题将为 Invoice Paid。如果你想为消息指定不同的主题,你可以在构建消息时调用 subject 方法:
/**
 * Get the mail representation of the notification.
 */
public function toMail(object $notifiable): MailMessage
{
    return (new MailMessage)
        ->subject('Notification Subject')
        ->line('...');
}
自定义 Mailer
默认情况下,将使用 config/mail.php 配置文件中定义的默认邮件程序发送电子邮件通知。但是,你可以在构建消息时通过调用 mailer 方法在运行时指定不同的邮件程序:
/**
 * Get the mail representation of the notification.
 */
public function toMail(object $notifiable): MailMessage
{
    return (new MailMessage)
        ->mailer('postmark')
        ->line('...');
}
自定义模板
你可以通过发布通知包的资源来修改邮件通知使用的 HTML 和纯文本模板。运行此命令后,邮件通知模板将位于resources/views/vendor/notifications目录中:
php artisan vendor:publish --tag=laravel-notifications附件
要向电子邮件通知添加附件,请在构建消息时使用 attach 方法。 attach 方法接受文件的绝对路径作为其第一个参数:
/**
 * Get the mail representation of the notification.
 */
public function toMail(object $notifiable): MailMessage
{
    return (new MailMessage)
        ->greeting('Hello!')
        ->attach('/path/to/file');
}将文件附加到消息时,你还可以通过将 array 作为第二个参数传递给 attach 方法来指定显示名称和/或 MIME 类型:
/**
 * Get the mail representation of the notification.
 */
public function toMail(object $notifiable): MailMessage
{
    return (new MailMessage)
        ->greeting('Hello!')
        ->attach('/path/to/file', [
            'as' => 'name.pdf',
            'mime' => 'application/pdf',
        ]);
}
必要时,可以使用 attachMany 方法将多个文件附加到一条消息中:
/**
 * Get the mail representation of the notification.
 */
public function toMail(object $notifiable): MailMessage
{
    return (new MailMessage)
        ->greeting('Hello!')
        ->attachMany([
            '/path/to/forge.svg',
            '/path/to/vapor.svg' => [
                'as' => 'Logo.svg',
                'mime' => 'image/svg+xml',
            ],
        ]);
}
你可以使用 attachFromStorageDisk 方法附加特定文件系统磁盘上存在的文件。此方法接受磁盘名称和该磁盘上文件的路径:
use App\Mail\InvoicePaid as InvoicePaidMailable;

/**
 * Get the mail representation of the notification.
 */
public function toMail(object $notifiable): Mailable
{
    return (new InvoicePaidMailable($this->invoice))
        ->to($notifiable->email)
        ->attachFromStorageDisk('s3', '/path/to/file', 'invoice.pdf', [
            'mime' => 'application/pdf',
        ]);
}
原始数据附件
attachData 方法可用于附加原始字节字符串作为附件。调用 attachData 方法时,你应该提供应分配给附件的文件名:
/**
 * Get the mail representation of the notification.
 */
public function toMail(object $notifiable): MailMessage
{
    return (new MailMessage)
        ->greeting('Hello!')
        ->attachData($this->pdf, 'name.pdf', [
            'mime' => 'application/pdf',
        ]);
}
添加标签与元数据
某些第三方电子邮件提供商(例如 Mailgun 和 Postmark)支持消息「标签」和「元数据」,它们可用于对应用程序发送的电子邮件进行分组和跟踪。你可以通过 tag 和 metadata 方法向电子邮件添加标签和元数据:
/**
 * Get the mail representation of the notification.
 */
public function toMail(object $notifiable): MailMessage
{
    return (new MailMessage)
        ->greeting('Comment Upvoted!')
        ->tag('upvote')
        ->metadata('comment_id', $this->comment->id);
}
如果你的应用程序使用 Mailgun 驱动程序,你可以查阅 Mailgun 的文档以获取有关 tags 和 metadata 的更多信息。同样,也可以查阅 Postmark 文档以获取有关 tags 和 metadata 支持的更多信息。
如果你的应用程序使用 Amazon SES 发送电子邮件,你应使用 metadata 方法将 SES「标签」 附加到消息。
自定义 Symfony 消息
MailMessage类的withSymfonyMessage方法允许你注册一个闭包,该闭包将在发送消息之前使用Symfony Message实例调用。这使你有机会在传递消息之前对其进行深度自定义:
use Symfony\Component\Mime\Email;

/**
 * Get the mail representation of the notification.
 */
public function toMail(object $notifiable): MailMessage
{
    return (new MailMessage)
        ->withSymfonyMessage(function (Email $message) {
            $message->getHeaders()->addTextHeader(
                'Custom-Header', 'Header Value'
            );
        });
}
使用邮件类
如果需要,你可以从通知的 toMail 方法返回完整的 可邮寄对象。当返回 Mailable 而不是 MailMessage 时,你需要使用可邮寄对象的 to 方法指定消息收件人:
use App\Mail\InvoicePaid as InvoicePaidMailable;
use Illuminate\Mail\Mailable;

/**
 * Get the mail representation of the notification.
 */
public function toMail(object $notifiable): Mailable
{
    return (new InvoicePaidMailable($this->invoice))
        ->to($notifiable->email);
}
邮件类与按需通知
如果你要发送 按需通知,则为 toMail 方法提供的 $notifiable 实例将是 Illuminate\Notifications\AnonymousNotifiable 的实例,它提供了 routeNotificationFor 方法,可用于检索应将按需通知发送到的电子邮件地址:
use App\Mail\InvoicePaid as InvoicePaidMailable;
use Illuminate\Notifications\AnonymousNotifiable;
use Illuminate\Mail\Mailable;

/**
 * Get the mail representation of the notification.
 */
public function toMail(object $notifiable): Mailable
{
    $address = $notifiable instanceof AnonymousNotifiable
        ? $notifiable->routeNotificationFor('mail')
        : $notifiable->email;

    return (new InvoicePaidMailable($this->invoice))
        ->to($address);
}
预览邮件通知
设计邮件通知模板时,可以像典型的 Blade 模板一样方便地在浏览器中快速预览呈现的邮件消息。因此,Laravel 允许你直接从路由关闭或控制器返回由邮件通知生成的任何邮件消息。当返回 MailMessage 时,它将在浏览器中渲染并显示,让你可以快速预览其设计,而无需将其发送到实际的电子邮件地址:
use App\Models\Invoice;
use App\Notifications\InvoicePaid;

Route::get('/notification', function () {
    $invoice = Invoice::find(1);

    return (new InvoicePaid($invoice))
        ->toMail($invoice->user);
});
Markdown 邮件通知
Markdown 邮件通知允许你利用预先构建的邮件通知模板,同时让你更自由地编写更长的自定义消息。由于消息是用 Markdown 编写的,Laravel 能够为消息呈现漂亮的、响应式的 HTML 模板,同时还自动生成纯文本副本。
生成消息
若要生成带对应 Markdown 模板的通知,可在 make:notification Artisan 命令中使用 --markdown 选项:
php artisan make:notification InvoicePaid --markdown=mail.invoice.paid与所有其他邮件通知一样,使用 Markdown 模板的通知应在其通知类上定义 toMail 方法。但是,不要使用 line 和 action 方法来构造通知,而是使用 markdown 方法来指定应使用的 Markdown 模板的名称。你希望提供给模板的数据数组可以作为该方法的第二个参数传递:
/**
 * Get the mail representation of the notification.
 */
public function toMail(object $notifiable): MailMessage
{
    $url = url('/invoice/'.$this->invoice->id);

    return (new MailMessage)
        ->subject('Invoice Paid')
        ->markdown('mail.invoice.paid', ['url' => $url]);
}
编写消息
Markdown 邮件通知使用 Blade 组件和 Markdown 语法的组合,让你可以轻松构建通知,同时利用 Laravel 预先制作的通知组件:
<x-mail::message>
# <Tr inline original="Invoice Paid">账单已支付</Tr>

Your invoice has been paid!

<x-mail::button :url="$url">
View Invoice
</x-mail::button>

Thanks,<br>
{{ config('app.name') }}
</x-mail::message>
INFO
编写 Markdown 电子邮件时不要使用过多的缩进。根据 Markdown 标准,Markdown 解析器会将缩进的内容呈现为代码块。
Button 组件
按钮组件呈现居中的按钮链接。该组件接受两个参数,一个url和一个可选的color。支持的颜色为 primary、green 和 red。你可以根据需要向通知添加任意数量的按钮组件:
<x-mail::button :url="$url" color="green">
View Invoice
</x-mail::button>
Panel 组件
面板组件在面板中呈现给定的文本块,该面板的背景颜色与通知的其余部分略有不同。这允许你将注意力吸引到给定的文本块:
<x-mail::panel>
This is the panel content.
</x-mail::panel>
Table 组件
表格组件允许你将 Markdown 表格转换为 HTML 表格。该组件接受 Markdown 表格作为其内容。使用默认的 Markdown 表格对齐语法支持表格列对齐:
<x-mail::table>
| Laravel       | Table         | Example       |
| ------------- | :-----------: | ------------: |
| Col 2 is      | Centered      | $10           |
| Col 3 is      | Right-Aligned | $20           |
</x-mail::table>
自定义组件
你可以将所有 Markdown 通知组件导出到你自己的应用程序中进行自定义。要导出组件,请使用 vendor:publish Artisan 命令发布 laravel-mail 资产标签:
php artisan vendor:publish --tag=laravel-mail该命令会将Markdown邮件组件发布到resources/views/vendor/mail目录。 mail目录将包含一个html和一个text目录,每个目录都包含每个可用组件的各自表示。你可以根据自己的喜好自由定制这些组件。
自定义 CSS
导出组件后,resources/views/vendor/mail/html/themes目录将包含一个default.css文件。你可以在此文件中自定义 CSS,你的样式将自动内联到 Markdown 通知的 HTML 表示中。
如果你想为 Laravel 的 Markdown 组件构建一个全新的主题,你可以在 html/themes 目录中放置一个 CSS 文件。命名并保存 CSS 文件后,更新 mail 配置文件的 theme 选项以匹配新主题的名称。
要自定义单个通知的主题,你可以在构建通知的邮件消息时调用 theme 方法。 theme 方法接受发送通知时应使用的主题名称:
/**
 * Get the mail representation of the notification.
 */
public function toMail(object $notifiable): MailMessage
{
    return (new MailMessage)
        ->theme('invoice')
        ->subject('Invoice Paid')
        ->markdown('mail.invoice.paid', ['url' => $url]);
}
数据库通知
前置条件
database通知通道将通知信息存储在数据库表中。该表将包含通知类型以及描述通知的 JSON 数据结构等信息。
你可以查询该表以在应用程序的用户界面中显示通知。但是,在此之前,你需要创建一个数据库表来保存通知。你可以使用 make:notifications-table 命令生成具有正确表架构的 migration:
php artisan make:notifications-table

php artisan migrate
INFO
如果你的可通知模型使用 UUID 或 ULID 主键,则应在通知表迁移中将 morphs 方法替换为 uuidMorphs 或 ulidMorphs。
格式化数据库通知
如果通知支持存储在数据库表中,则应在通知类上定义 toDatabase 或 toArray 方法。此方法将接收一个 $notifiable 实体并应返回一个纯 PHP 数组。返回的数组将被编码为 JSON 并存储在 notifications 表的 data 列中。让我们看一个示例 toArray 方法:
/**
 * Get the array representation of the notification.
 *
 * @return array<string, mixed>
 */
public function toArray(object $notifiable): array
{
    return [
        'invoice_id' => $this->invoice->id,
        'amount' => $this->invoice->amount,
    ];
}当通知存储在应用程序的数据库中时,默认情况下,type列将设置为通知的类名称,read_at列将为null。但是,你可以通过在通知类中定义 databaseType 和 initialDatabaseReadAtValue 方法来自定义此行为:
use Illuminate\Support\Carbon;

/**
 * Get the notification's database type.
 */
public function databaseType(object $notifiable): string
{
    return 'invoice-paid';
}

/**
 * Get the initial value for the "read_at" column.
 */
public function initialDatabaseReadAtValue(): ?Carbon
{
    return null;
}
toDatabase 与 toArray
toArray 方法也被 broadcast 通道用来确定将哪些数据广播到 JavaScript 支持的前端。如果你希望 database 和 broadcast 通道有两种不同的数组表示形式,则应定义 toDatabase 方法而不是 toArray 方法。
访问通知
将通知存储在数据库中后,你需要一种便捷的方式从可通知实体访问它们。 Illuminate\Notifications\Notifiable 特征包含在 Laravel 的默认 App\Models\User 模型中,其中包含一个 notifications Eloquent 关系,它返回实体的通知。要获取通知,你可以像任何其他 Eloquent 关系一样访问此方法。默认情况下,通知将按 created_at 时间戳排序,最新通知位于集合的开头:
$user = App\Models\User::find(1);

foreach ($user->notifications as $notification) {
    echo $notification->type;
}如果你只想检索「未读」通知,你可以使用unreadNotifications关系。同样,这些通知将按 created_at 时间戳排序,最新通知位于集合的开头:
$user = App\Models\User::find(1);

foreach ($user->unreadNotifications as $notification) {
    echo $notification->type;
}
如果你只想检索「已读」通知,你可以使用 readNotifications 关系:
$user = App\Models\User::find(1);

foreach ($user->readNotifications as $notification) {
    echo $notification->type;
}
INFO
要从 JavaScript 客户端访问通知,你应该为应用程序定义一个通知控制器,该控制器返回可通知实体(例如当前用户)的通知。然后,你可以从 JavaScript 客户端向该控制器的 URL 发出 HTTP 请求。
将通知标记为已读
通常,当用户查看通知时,你需要将其标记为「已读」。 Illuminate\Notifications\Notifiable特征提供了markAsRead方法,该方法更新通知数据库记录中的read_at列:
$user = App\Models\User::find(1);

foreach ($user->unreadNotifications as $notification) {
    $notification->markAsRead();
}
但是,你可以直接在通知集合上使用 markAsRead 方法,而不是循环遍历每个通知:
$user->unreadNotifications->markAsRead();你还可以使用批量更新查询将所有通知标记为已读,而无需从数据库中检索它们:
$user = App\Models\User::find(1);

$user->unreadNotifications()->update(['read_at' => now()]);你可以delete通知将它们从表格中完全删除:
$user->notifications()->delete();广播通知
前置条件
在广播通知之前,你应该配置并熟悉 Laravel 的 事件广播 服务。事件广播提供了一种从 JavaScript 支持的前端对服务器端 Laravel 事件做出反应的方法。
格式化广播通知
broadcast 通道使用 Laravel 的 事件广播 服务来广播通知,允许 JavaScript 支持的前端实时捕获通知。如果通知支持广播,你可以在通知类上定义 toBroadcast 方法。此方法将接收一个 $notifiable 实体并应返回一个 BroadcastMessage 实例。如果toBroadcast方法不存在,则使用toArray方法来收集应该广播的数据。返回的数据将被编码为 JSON 并广播到 JavaScript 支持的前端。让我们看一个示例 toBroadcast 方法:
use Illuminate\Notifications\Messages\BroadcastMessage;

/**
 * Get the broadcastable representation of the notification.
 */
public function toBroadcast(object $notifiable): BroadcastMessage
{
    return new BroadcastMessage([
        'invoice_id' => $this->invoice->id,
        'amount' => $this->invoice->amount,
    ]);
}
广播队列配置
所有广播通知都排队等待广播。如果你想配置用于对广播操作进行排队的队列连接或队列名称,你可以使用BroadcastMessage的onConnection和onQueue方法:
return (new BroadcastMessage($data))
    ->onConnection('sqs')
    ->onQueue('broadcasts');
自定义通知类型
除了你指定的数据之外,所有广播通知还有一个 type 字段,其中包含通知的完整类名。如果你想自定义通知type,你可以在通知类上定义一个broadcastType方法:
/**
 * Get the type of the notification being broadcast.
 */
public function broadcastType(): string
{
    return 'broadcast.message';
}
监听通知
通知将在使用 {notifiable}.{id} 约定格式化的私人频道上广播。因此,如果你向 ID 为 1 的 App\Models\User 实例发送通知,则该通知将在 App.Models.User.1 专用频道上广播。当使用Laravel Echo时,你可以使用notification方法轻松监听频道上的通知:
Echo.private('App.Models.User.' + userId)
    .notification((notification) => {
        console.log(notification.type);
    });
使用 React、Vue 或 Svelte
Laravel Echo 包含 React、Vue 和 Svelte 钩子,可以轻松监听通知。首先,调用 useEchoNotification 钩子,该钩子用于监听通知。当消费组件被卸载时,useEchoNotification钩子将自动离开通道:
import { useEchoNotification } from "@laravel/echo-react";

useEchoNotification(
    `App.Models.User.${userId}`,
    (notification) => {
        console.log(notification.type);
    },
);<script setup lang="ts">
import { useEchoNotification } from "@laravel/echo-vue";
useEchoNotification(
`App.Models.User.${userId}`,
(notification) => {
console.log(notification.type);
},
);
</script><script>
import { useEchoNotification } from "@laravel/echo-svelte";
useEchoNotification(
`App.Models.User.${userId}`,
(notification) => {
console.log(notification.type);
},
);
</script>默认情况下,挂钩侦听所有通知。要指定你想要监听的通知类型,你可以向 useEchoNotification 提供字符串或类型数组:
import { useEchoNotification } from "@laravel/echo-react";

useEchoNotification(
    `App.Models.User.${userId}`,
    (notification) => {
        console.log(notification.type);
    },
    'App.Notifications.InvoicePaid',
);<script setup lang="ts">
import { useEchoNotification } from "@laravel/echo-vue";
useEchoNotification(
`App.Models.User.${userId}`,
(notification) => {
console.log(notification.type);
},
'App.Notifications.InvoicePaid',
);
</script><script>
import { useEchoNotification } from "@laravel/echo-svelte";
useEchoNotification(
`App.Models.User.${userId}`,
(notification) => {
console.log(notification.type);
},
'App.Notifications.InvoicePaid',
);
</script>你还可以指定通知有效负载数据的形状,以提供更高的类型安全性和编辑便利性:
type InvoicePaidNotification = {
    invoice_id: number;
    created_at: string;
};

useEchoNotification<InvoicePaidNotification>(
    `App.Models.User.${userId}`,
    (notification) => {
        console.log(notification.invoice_id);
        console.log(notification.created_at);
        console.log(notification.type);
    },
    'App.Notifications.InvoicePaid',
);
自定义通知渠道
如果你想自定义实体的广播通知在哪个频道上广播,你可以在可通知实体上定义 receivesBroadcastNotificationsOn 方法:
<?php

namespace App\Models;

use Illuminate\Broadcasting\PrivateChannel;
use Illuminate\Foundation\Auth\User as Authenticatable;
use Illuminate\Notifications\Notifiable;

class User extends Authenticatable
{
    use Notifiable;

    /**
     * The channels the user receives notification broadcasts on.
     */
    public function receivesBroadcastNotificationsOn(): string
    {
        return 'users.'.$this->id;
    }
}
短信通知
前置条件
在 Laravel 中发送短信通知由 Vonage(以前称为 Nexmo)提供支持。在通过 Vonage 发送通知之前,你需要安装 laravel/vonage-notification-channel 和 guzzlehttp/guzzle 软件包:
composer require laravel/vonage-notification-channel guzzlehttp/guzzle该软件包包含一个配置文件。但是,你不需要将此配置文件导出到你自己的应用程序。你可以简单地使用 VONAGE_KEY 和 VONAGE_SECRET 环境变量来定义你的 Vonage 公钥和密钥。
定义密钥后,你应该设置一个 VONAGE_SMS_FROM 环境变量,用于定义默认发送 SMS 消息的电话号码。你可以在 Vonage 控制面板中生成此电话号码:
VONAGE_SMS_FROM=15556666666格式化短信通知
如果通知支持以短信形式发送,则应在通知类上定义 toVonage 方法。此方法将接收一个 $notifiable 实体并应返回一个 Illuminate\Notifications\Messages\VonageMessage 实例:
use Illuminate\Notifications\Messages\VonageMessage;

/**
 * Get the Vonage / SMS representation of the notification.
 */
public function toVonage(object $notifiable): VonageMessage
{
    return (new VonageMessage)
        ->content('Your SMS message content');
}
Unicode 内容
如果你的短信将包含 unicode 字符,则应在构造 VonageMessage 实例时调用 unicode 方法:
use Illuminate\Notifications\Messages\VonageMessage;

/**
 * Get the Vonage / SMS representation of the notification.
 */
public function toVonage(object $notifiable): VonageMessage
{
    return (new VonageMessage)
        ->content('Your unicode message')
        ->unicode();
}
自定义 From 号码
如果你想从与 VONAGE_SMS_FROM 环境变量指定的电话号码不同的电话号码发送一些通知,你可以在 VonageMessage 实例上调用 from 方法:
use Illuminate\Notifications\Messages\VonageMessage;

/**
 * Get the Vonage / SMS representation of the notification.
 */
public function toVonage(object $notifiable): VonageMessage
{
    return (new VonageMessage)
        ->content('Your SMS message content')
        ->from('15554443333');
}
添加客户端引用
如果你想跟踪每个用户、团队或客户的成本,你可以在通知中添加「客户参考」。 Vonage 将允许你使用此客户参考生成报告,以便你可以更好地了解特定客户的 SMS 使用情况。客户端引用可以是最多 40 个字符的任何字符串:
use Illuminate\Notifications\Messages\VonageMessage;

/**
 * Get the Vonage / SMS representation of the notification.
 */
public function toVonage(object $notifiable): VonageMessage
{
    return (new VonageMessage)
        ->clientReference((string) $notifiable->id)
        ->content('Your SMS message content');
}
路由短信通知
要将 Vonage 通知路由到正确的电话号码,请在你的通知实体上定义 routeNotificationForVonage 方法:
<?php

namespace App\Models;

use Illuminate\Foundation\Auth\User as Authenticatable;
use Illuminate\Notifications\Notifiable;
use Illuminate\Notifications\Notification;

class User extends Authenticatable
{
    use Notifiable;

    /**
     * Route notifications for the Vonage channel.
     */
    public function routeNotificationForVonage(Notification $notification): string
    {
        return $this->phone_number;
    }
}
Slack 通知
前置条件
在发送 Slack 通知之前,你应该通过 Composer 安装 Slack 通知通道:
composer require laravel/slack-notification-channel此外,你必须为 Slack 工作区创建一个 Slack App。
如果你只需要向创建应用程序的同一 Slack 工作区发送通知,则应确保你的应用程序具有 chat:write、chat:write.public 和 chat:write.customize 范围。可以从 Slack 内的「OAuth 和权限」应用程序管理选项卡添加这些范围。
接下来,复制应用程序的「机器人用户 OAuth 令牌」并将其放置在应用程序的 services.php 配置文件中的 slack 配置数组中。该令牌可以在 Slack 中的「OAuth & Permissions」选项卡上找到:
'slack' => [
    'notifications' => [
        'bot_user_oauth_token' => env('SLACK_BOT_USER_OAUTH_TOKEN'),
        'channel' => env('SLACK_BOT_USER_DEFAULT_CHANNEL'),
    ],
],
应用分发
如果你的应用程序将向应用程序用户拥有的外部 Slack 工作区发送通知,你将需要通过 Slack「分发」你的应用程序。可以通过 Slack 中应用程序的「管理分发」选项卡来管理应用程序分发。一旦你的应用程序被分发,你可以使用 Socialite 代表你的应用程序用户获取 Slack Bot 代币。
格式化 Slack 通知
如果通知支持作为 Slack 消息发送,你应该在通知类上定义 toSlack 方法。此方法将接收一个 $notifiable 实体并应返回一个 Illuminate\Notifications\Slack\SlackMessage 实例。你可以使用 Slack 的 Block Kit API 构建丰富的通知。以下示例可以在 Slack 的 Block Kit builder 中预览:
use Illuminate\Notifications\Slack\BlockKit\Blocks\ContextBlock;
use Illuminate\Notifications\Slack\BlockKit\Blocks\SectionBlock;
use Illuminate\Notifications\Slack\SlackMessage;

/**
 * Get the Slack representation of the notification.
 */
public function toSlack(object $notifiable): SlackMessage
{
    return (new SlackMessage)
        ->text('One of your invoices has been paid!')
        ->headerBlock('Invoice Paid')
        ->contextBlock(function (ContextBlock $block) {
            $block->text('Customer #1234');
        })
        ->sectionBlock(function (SectionBlock $block) {
            $block->text('An invoice has been paid.');
            $block->field("*Invoice No:*\n1000")->markdown();
            $block->field("*Invoice Recipient:*\ntaylor@laravel.com")->markdown();
        })
        ->dividerBlock()
        ->sectionBlock(function (SectionBlock $block) {
            $block->text('Congratulations!');
        });
}
使用 Slack 的 Block Kit Builder 模板
你可以将 Slack 的 Block Kit Builder 生成的原始 JSON 负载提供给 usingBlockKitTemplate 方法,而不是使用流畅的消息构建器方法来构建 Block Kit 消息:
use Illuminate\Notifications\Slack\SlackMessage;
use Illuminate\Support\Str;

/**
 * Get the Slack representation of the notification.
 */
public function toSlack(object $notifiable): SlackMessage
{
    $template = <<<JSON
        {
          "blocks": [
            {
              "type": "header",
              "text": {
                "type": "plain_text",
                "text": "Team Announcement"
              }
            },
            {
              "type": "section",
              "text": {
                "type": "plain_text",
                "text": "We are hiring!"
              }
            }
          ]
        }
    JSON;

    return (new SlackMessage)
        ->usingBlockKitTemplate($template);
}
Slack 交互性
Slack 的 Block Kit 通知系统提供了强大的功能来处理用户交互。要利用这些功能,你的 Slack 应用程序应启用「交互性」并配置一个指向你的应用程序提供的 URL 的「请求 URL」。这些设置可以通过 Slack 中的「交互性和快捷方式」应用程序管理选项卡进行管理。
在以下使用 actionsBlock 方法的示例中,Slack 将向你的「请求 URL」发送 POST 请求,其负载包含单击该按钮的 Slack 用户、所单击按钮的 ID 等。然后,你的应用程序可以根据负载确定要采取的操作。你还应该验证请求是由 Slack 发出的:
use Illuminate\Notifications\Slack\BlockKit\Blocks\ActionsBlock;
use Illuminate\Notifications\Slack\BlockKit\Blocks\ContextBlock;
use Illuminate\Notifications\Slack\BlockKit\Blocks\SectionBlock;
use Illuminate\Notifications\Slack\SlackMessage;

/**
 * Get the Slack representation of the notification.
 */
public function toSlack(object $notifiable): SlackMessage
{
    return (new SlackMessage)
        ->text('One of your invoices has been paid!')
        ->headerBlock('Invoice Paid')
        ->contextBlock(function (ContextBlock $block) {
            $block->text('Customer #1234');
        })
        ->sectionBlock(function (SectionBlock $block) {
            $block->text('An invoice has been paid.');
        })
        ->actionsBlock(function (ActionsBlock $block) {
             // ID defaults to "button_acknowledge_invoice"...
            $block->button('Acknowledge Invoice')->primary();

            // Manually configure the ID...
            $block->button('Deny')->danger()->id('deny_invoice');
        });
}
确认模态框
如果你希望用户在执行操作之前需要确认操作,你可以在定义按钮时调用 confirm 方法。 confirm 方法接受一条消息和一个接收 ConfirmObject 实例的闭包:
use Illuminate\Notifications\Slack\BlockKit\Blocks\ActionsBlock;
use Illuminate\Notifications\Slack\BlockKit\Blocks\ContextBlock;
use Illuminate\Notifications\Slack\BlockKit\Blocks\SectionBlock;
use Illuminate\Notifications\Slack\BlockKit\Composites\ConfirmObject;
use Illuminate\Notifications\Slack\SlackMessage;

/**
 * Get the Slack representation of the notification.
 */
public function toSlack(object $notifiable): SlackMessage
{
    return (new SlackMessage)
        ->text('One of your invoices has been paid!')
        ->headerBlock('Invoice Paid')
        ->contextBlock(function (ContextBlock $block) {
            $block->text('Customer #1234');
        })
        ->sectionBlock(function (SectionBlock $block) {
            $block->text('An invoice has been paid.');
        })
        ->actionsBlock(function (ActionsBlock $block) {
            $block->button('Acknowledge Invoice')
                ->primary()
                ->confirm(
                    'Acknowledge the payment and send a thank you email?',
                    function (ConfirmObject $dialog) {
                        $dialog->confirm('Yes');
                        $dialog->deny('No');
                    }
                );
        });
}
检查 Slack Blocks
如果你想快速检查正在构建的块,可以在 SlackMessage 实例上调用 dd 方法。 dd 方法将生成 URL 并将其转储到 Slack 的 Block Kit Builder,该 URL 会在浏览器中显示有效负载和通知的预览。你可以将 true 传递给 dd 方法来转储原始有效负载:
return (new SlackMessage)
    ->text('One of your invoices has been paid!')
    ->headerBlock('Invoice Paid')
    ->dd();
路由 Slack 通知
要将 Slack 通知定向到适当的 Slack 团队和渠道,请在可通知模型上定义 routeNotificationForSlack 方法。此方法可以返回三个值之一:
- `null` - 推迟路由到通知本身中配置的通道。你可以在构建 `SlackMessage` 时使用 `to` 方法来配置通知中的通道。
- 指定要将通知发送到的 Slack 通道的字符串,例如`#support-channel`。
- 一个 `SlackRoute` 实例,允许你指定 OAuth 令牌和通道名称,例如`SlackRoute::make($this->slack_channel, $this->slack_token)`。此方法应用于向外部工作区发送通知。
例如,从 routeNotificationForSlack 方法返回 #support-channel 会将通知发送到与位于应用程序的 services.php 配置文件中的 Bot 用户 OAuth 令牌关联的工作区中的 #support-channel 通道:
<?php

namespace App\Models;

use Illuminate\Foundation\Auth\User as Authenticatable;
use Illuminate\Notifications\Notifiable;
use Illuminate\Notifications\Notification;

class User extends Authenticatable
{
    use Notifiable;

    /**
     * Route notifications for the Slack channel.
     */
    public function routeNotificationForSlack(Notification $notification): mixed
    {
        return '#support-channel';
    }
}
通知外部 Slack 工作区
INFO
在向外部 Slack 工作区发送通知之前,你的 Slack 应用程序必须是分布式。
当然,你经常需要向应用程序用户拥有的 Slack 工作区发送通知。为此,你首先需要为用户获取 Slack OAuth 令牌。值得庆幸的是,Laravel Socialite 包含一个 Slack 驱动程序,可让你轻松地使用 Slack 验证应用程序的用户并获取机器人令牌。
获得机器人令牌并将其存储在应用程序的数据库中后,你可以利用 SlackRoute::make 方法将通知路由到用户的工作区。此外,你的应用程序可能需要为用户提供一个机会来指定应将通知发送到哪个通道:
<?php

namespace App\Models;

use Illuminate\Foundation\Auth\User as Authenticatable;
use Illuminate\Notifications\Notifiable;
use Illuminate\Notifications\Notification;
use Illuminate\Notifications\Slack\SlackRoute;

class User extends Authenticatable
{
    use Notifiable;

    /**
     * Route notifications for the Slack channel.
     */
    public function routeNotificationForSlack(Notification $notification): mixed
    {
        return SlackRoute::make($this->slack_channel, $this->slack_token);
    }
}
本地化通知
Laravel 允许你以 HTTP 请求当前区域设置以外的区域设置发送通知,如果通知排队,甚至会记住此区域设置。
为了实现这一点,Illuminate\Notifications\Notification类提供了locale方法来设置所需的语言。当评估通知时,应用程序将更改为此区域设置,然后在评估完成时恢复到之前的区域设置:
$user->notify((new InvoicePaid($invoice))->locale('es'));多个可通知条目的本地化也可以通过 Notification 外观来实现:
Notification::locale('es')->send(
    $users, new InvoicePaid($invoice)
);
用户首选语言区域
有时,应用程序会存储每个用户的首选区域设置。通过在你的可通知模型上实现 HasLocalePreference 合约,你可以指示 Laravel 在发送通知时使用此存储的区域设置:
use Illuminate\Contracts\Translation\HasLocalePreference;

class User extends Model implements HasLocalePreference
{
    /**
     * Get the user's preferred locale.
     */
    public function preferredLocale(): string
    {
        return $this->locale;
    }
}
实现该接口后,Laravel 在向模型发送通知和邮件时将自动使用首选区域设置。因此,使用该接口时无需调用locale方法:
$user->notify(new InvoicePaid($invoice));测试
你可以使用 Notification Facade 的 fake 方法来阻止发送通知。通常,发送通知与你实际测试的代码无关。最有可能的是,简单地断言 Laravel 被指示发送给定的通知就足够了。
调用 Notification Facade 的 fake 方法后,你可以断言通知已指示发送给用户,甚至检查通知收到的数据:
<?php

use App\Notifications\OrderShipped;
use Illuminate\Support\Facades\Notification;

test('orders can be shipped', function () {
    Notification::fake();

    // Perform order shipping...

    // Assert that no notifications were sent...
    Notification::assertNothingSent();

    // Assert a notification was sent to the given users...
    Notification::assertSentTo(
        [$user], OrderShipped::class
    );

    // Assert a notification was not sent...
    Notification::assertNotSentTo(
        [$user], AnotherNotification::class
    );

    // Assert a notification was sent twice...
    Notification::assertSentTimes(WeeklyReminder::class, 2);

    // Assert that a given number of notifications were sent...
    Notification::assertCount(3);
});<?php
namespace Tests\Feature;
use App\Notifications\OrderShipped;
use Illuminate\Support\Facades\Notification;
use Tests\TestCase;
class ExampleTest extends TestCase
{
public function test_orders_can_be_shipped(): void
{
Notification::fake();
// Perform order shipping...
// Assert that no notifications were sent...
Notification::assertNothingSent();
// Assert a notification was sent to the given users...
Notification::assertSentTo(
[$user], OrderShipped::class
);
// Assert a notification was not sent...
Notification::assertNotSentTo(
[$user], AnotherNotification::class
);
// Assert a notification was sent twice...
Notification::assertSentTimes(WeeklyReminder::class, 2);
// Assert that a given number of notifications were sent...
Notification::assertCount(3);
}
}你可以将闭包传递给 assertSentTo 或 assertNotSentTo 方法,以断言已发送通知并通过给定的「真实性测试」。如果至少发送了一个通过给定真值测试的通知,则断言将成功:
Notification::assertSentTo(
    $user,
    function (OrderShipped $notification, array $channels) use ($order) {
        return $notification->order->id === $order->id;
    }
);
按需通知
如果你正在测试的代码发送按需通知,你可以测试按需通知是否是通过assertSentOnDemand方法发送的:
Notification::assertSentOnDemand(OrderShipped::class);通过将闭包作为第二个参数传递给 assertSentOnDemand 方法,你可以确定按需通知是否发送到正确的「路由」地址:
Notification::assertSentOnDemand(
    OrderShipped::class,
    function (OrderShipped $notification, array $channels, object $notifiable) use ($user) {
        return $notifiable->routes['mail'] === $user->email;
    }
);
通知事件
通知发送事件
当发送通知时,通知系统会调度 Illuminate\Notifications\Events\NotificationSending 事件。这包含「可通知」实体和通知实例本身。你可以在应用程序中为此事件创建事件监听器:
use Illuminate\Notifications\Events\NotificationSending;

class CheckNotificationStatus
{
    /**
     * Handle the event.
     */
    public function handle(NotificationSending $event): void
    {
        // ...
    }
}
如果 NotificationSending 事件的事件监听器从其 handle 方法返回 false,则不会发送通知:
/**
 * Handle the event.
 */
public function handle(NotificationSending $event): bool
{
    return false;
}
在事件侦听器中,你可以访问事件的 notifiable、notification 和 channel 属性,以了解有关通知接收者或通知本身的更多信息:
/**
 * Handle the event.
 */
public function handle(NotificationSending $event): void
{
    // $event->channel
    // $event->notifiable
    // $event->notification
}
通知已发送事件
发送通知时,通知系统会调度 Illuminate\Notifications\Events\NotificationSent 事件。这包含「可通知」实体和通知实例本身。你可以在应用程序中为此事件创建事件监听器:
use Illuminate\Notifications\Events\NotificationSent;

class LogNotification
{
    /**
     * Handle the event.
     */
    public function handle(NotificationSent $event): void
    {
        // ...
    }
}
在事件侦听器中,你可以访问事件的 notifiable、notification、channel 和 response 属性,以了解有关通知接收者或通知本身的更多信息:
/**
 * Handle the event.
 */
public function handle(NotificationSent $event): void
{
    // $event->channel
    // $event->notifiable
    // $event->notification
    // $event->response
}
自定义渠道
Laravel 附带了一些通知渠道,但你可能想编写自己的驱动程序以通过其他渠道传递通知。 Laravel 让一切变得简单。首先,定义一个包含 send 方法的类。该方法应该接收两个参数:$notifiable和$notification。
在 send 方法中,你可以调用通知上的方法来检索你的通道理解的消息对象,然后将通知发送到 $notifiable 实例,但你希望:
<?php

namespace App\Notifications;

use Illuminate\Notifications\Notification;

class VoiceChannel
{
    /**
     * Send the given notification.
     */
    public function send(object $notifiable, Notification $notification): void
    {
        $message = $notification->toVoice($notifiable);

        // Send notification to the $notifiable instance...
    }
}
定义通知通道类后,你可以从任何通知的 via 方法返回类名称。在此示例中,通知的 toVoice 方法可以返回你选择代表语音消息的任何对象。例如,你可以定义自己的 VoiceMessage 类来表示这些消息:
<?php

namespace App\Notifications;

use App\Notifications\Messages\VoiceMessage;
use App\Notifications\VoiceChannel;
use Illuminate\Bus\Queueable;
use Illuminate\Contracts\Queue\ShouldQueue;
use Illuminate\Notifications\Notification;

class InvoicePaid extends Notification
{
    use Queueable;

    /**
     * Get the notification channels.
     */
    public function via(object $notifiable): string
    {
        return VoiceChannel::class;
    }

    /**
     * Get the voice representation of the notification.
     */
    public function toVoice(object $notifiable): VoiceMessage
    {
        // ...
    }
}